To run a portable monitor reliably with a Mac, you need three things to line up: the Mac's display capabilities (Apple Silicon vs Intel), the monitor's input and power method, and accessories that keep signal and ergonomics stable. Prioritize a USB‑C hub with the right display mode, a rigid stand, certified USB‑C cables, and a protective sleeve that fits your daily carry.
Compatibility and setup checklist for Mac + portable monitor
- Confirm your Mac model and chip: Apple Silicon (M1/M2/M3/M4) vs Intel, because external-display rules differ.
- Decide how the monitor will connect: USB‑C (DisplayPort Alt Mode) or HDMI via a hub; avoid USB data-only USB‑C ports.
- Plan power: will the monitor draw from the Mac, or use a separate USB‑C PD charger (often more stable)?
- Pick a stand that can hold both MacBook + monitor without flex; don't rely on a soft folio as the only support.
- Use a known-good cable: short, certified, and rated for video (many USB‑C cables are charge-only).
- Protect the setup for travel: sleeve/case that matches your bag style and allows quick cable access.
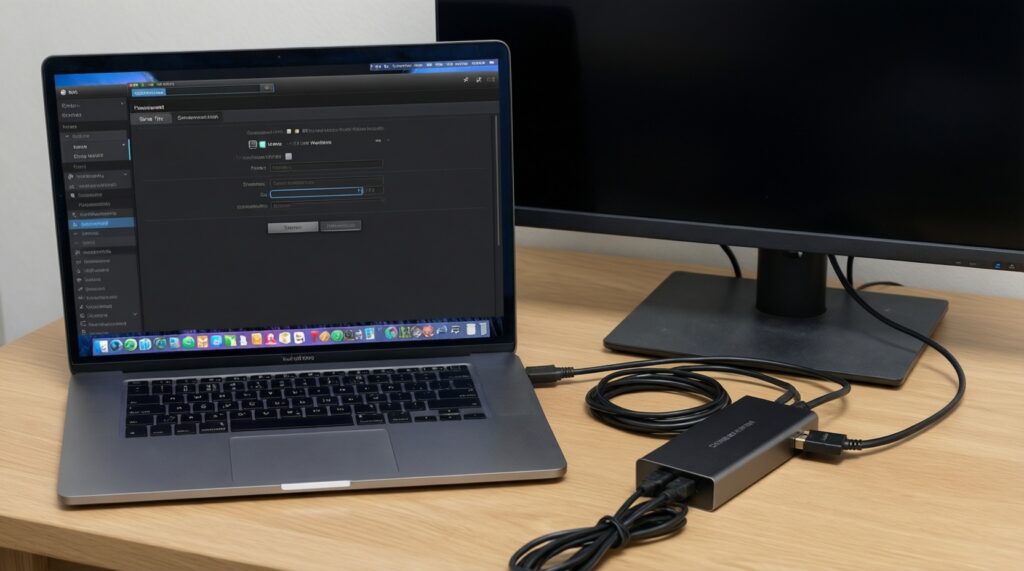
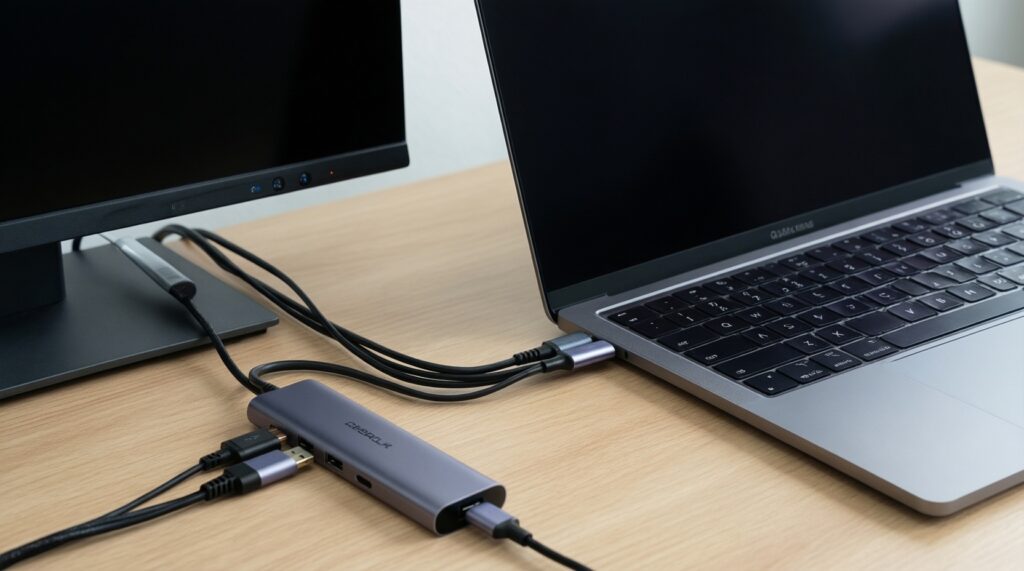
Choosing a USB‑C hub: ports, power delivery and display chaining
Best fit: You need a hub when your portable monitor is HDMI-only, when you also need USB-A/SD/Ethernet, or when you want one plug to handle charging + peripherals. A good hub also reduces repeated plugging into the Mac's ports.
Skip the hub when: your portable monitor supports USB‑C video (DP Alt Mode) and you can connect it directly with a proper USB‑C video cable-this is usually the simplest and most reliable path.
- Port checks (yes/no): Does it have HDMI (or DP) that supports your target resolution/refresh? Does it have USB‑C Power Delivery (PD) pass-through if you want one-cable charging?
- Display mode checks: For many Apple Silicon Macs, MST daisy chaining is not a universal solution; favor direct connections or a hub designed for Mac display output rather than relying on chaining.
- Power sanity: If the hub has PD pass-through, use a charger with enough headroom for Mac + monitor + hub; underpowered PD often causes flicker, disconnects, or dim panels.
- Buying in Thailand: When you compare ฮับ USB-C สำหรับ Mac ราคา, treat cheap but feature-packed listings cautiously: verify PD wattage, supported resolution/refresh, and whether the USB‑C port is full-featured or just data.
Picking a portable monitor that matches Mac color and resolution
Have these ready before choosing or calibrating:
- Your Mac model year/chip and available ports (USB‑C/Thunderbolt count and whether you also need charging).
- The monitor's input spec: USB‑C (DP Alt Mode), HDMI, or both; note if the USB‑C port is full-featured.
- Your typical apps: text-heavy (coding/docs), color-critical (photo/video), or mixed.
- macOS access: System Settings > Displays (for resolution, refresh, HDR, color profile).
- Resolution/scaling: macOS looks best when you choose a comfortable Looks like scaling option; avoid forcing non-native modes that make text blurry. If you do long writing/coding sessions, prioritize crisp text over maximum spec-sheet resolution.
- Panel choice (IPS vs OLED): IPS is typically forgiving for office work and stable whites; OLED can look amazing but may require more care with static UI elements and brightness consistency for long sessions.
- Color expectations: If the monitor advertises wide gamut or HDR, confirm macOS exposes HDR and a sensible color profile in Displays; if not, treat it as SDR and tune brightness/contrast for comfort.
- Apple Silicon vs Intel: Apple Silicon laptops may have stricter limits on how many external displays work natively; plan your workflow around one reliable portable display unless your specific Mac model supports more.
Stands and mounts: stability, height and tilt for working on the go
- Clear a flat surface; avoid soft beds/sofas (heat + wobble + cable strain).
- Check cable routing so nothing pulls the Mac's USB‑C port sideways.
- Wipe rubber feet and the desk surface to prevent sliding.
- If your monitor has a folio stand, confirm it locks at your intended angle before connecting cables.
- If you plan to ซื้อขาตั้งโน้ตบุ๊ก MacBook, prioritize rigidity and a hinge that doesn't drift under typing.
-
Set primary screen height first
Place the MacBook (or the portable monitor) as your primary screen at eye level as much as possible. Use the stand to raise the device you stare at most to reduce neck flex.
- If you type on the MacBook keyboard, keep the Mac lower and raise the portable monitor instead.
- If you use an external keyboard, raise the MacBook and/or monitor to align top edges.
-
Lock tilt, then connect cables
Adjust tilt until reflections are minimal, then connect USB‑C/HDMI. Connecting first can tug the stand and change your angle, especially with stiffer cables.
-
Route cables to eliminate torque
Run the cable behind the stand or along the side so it doesn't pull the connector down. Torque on USB‑C ports is a common cause of random disconnects during movement.
- If your monitor is bus-powered, avoid long or heavy cables that act like a lever.
-
Stabilize the two-screen triangle
Arrange Mac + monitor so the bases form a stable triangle on the desk, not a straight line that tips easily. Keep heavier items (power bank/charger) away from cable runs to prevent snags.
-
Do a 30-second wobble and heat check
Lightly tap the desk and type a few lines; if the monitor bounces, lower the center of gravity or reduce stand height. Check that vents are not blocked and surfaces aren't overheating.
Cables and adapters: bandwidth, certification and length choices
- USB‑C cable is explicitly rated for video (DisplayPort Alt Mode) or high-speed data (not charging only).
- Cable length is as short as practical for your desk layout (shorter usually means fewer signal issues).
- Connector fit is snug on both Mac and monitor; no wobble under gentle movement.
- If using HDMI via hub, use a modern HDMI cable from a reputable brand; avoid ultra-thin unknown cables.
- For high refresh or higher resolutions, confirm the hub's HDMI/DP spec supports it; otherwise cap refresh to a stable value in macOS.
- If the monitor is bus-powered, test with a separate PD charger to see if stability improves (bus power can be marginal).
- Keep one spare known-good cable in your bag; this is the fastest way to isolate problems.
- When shopping for สาย USB-C คุณภาพดีสำหรับ MacBook, verify the listing mentions video support, not just fast charging wattage.
Protective sleeves and cases: drop protection and quick-access features
- Buying by screen-inch only: many sleeves don't fit once you add a hard shell, skin, or thicker bezels.
- No padding at corners: corner impacts are common during bag drops; pick a sleeve/case with real corner structure.
- Zipper scraping risk: unlined zippers can mark aluminum; ensure there's a fabric lip/guard.
- Single-compartment stuffing: packing charger, hub, and cables against the Mac/monitor increases pressure points and scratch risk.
- Too-tight cable pocket: forcing a stiff hub or power brick into a tight pocket can bend the monitor panel or stress the Mac lid.
- Water resistance assumptions: splash resistant is not safe in heavy rain; keep a simple dry bag liner if you commute.
- Slow access: if you open/close multiple times daily, choose quick-access features (magnetic flap or smooth zipper path) without compromising protection.
- Ignoring local pricing tradeoffs: when comparing กระเป๋ากันกระแทก MacBook ราคา, prioritize build and corner protection over extra pockets you won't use.
Optimizing macOS and workflow for a single or dual portable display
- Direct USB‑C display workflow (most reliable): Connect the portable monitor directly via a USB‑C video cable; then go to System Settings > Displays to set resolution/scaling and arrange screens.
- Hub-based desk workflow (one-cable convenience): Use a USB‑C hub with PD pass-through, connect HDMI/USB peripherals to the hub, and plug one USB‑C into the Mac; best when you also need SD/USB-A/Ethernet.
- Single external + MacBook clamshell (clean posture): Use an external keyboard/mouse and power, close the MacBook, and drive the portable monitor as the primary. Use this when desk space is tight and you want one focal screen.
- When you need more screens than your Mac supports natively: Prefer simplifying to one portable monitor for stability, or use a different workflow (virtual desktops/Spaces, Stage Manager) instead of chasing fragile multi-adapter chains.
If you're building a travel kit, think in terms of อุปกรณ์เสริม MacBook ที่ควรมี: one solid hub (only if you need it), one rigid stand, one known-good USB‑C video cable, and one protective sleeve that matches how you commute.
Troubleshooting common connection and performance issues
My portable monitor powers on but shows no signal. What should I check first?
Confirm the USB‑C port on the monitor supports video input (DP Alt Mode) and your cable supports video. If you're using a hub, test direct USB‑C (or direct HDMI) to isolate whether the hub is the bottleneck.
Why does the display disconnect when I move the laptop slightly?
Reduce cable torque: reroute the cable and avoid heavy/long connectors pulling down. Swap to a shorter, higher-quality cable and test with external power instead of bus power.
Why does text look blurry or scaling feel wrong in macOS?
Go to System Settings > Displays and choose Default or a comfortable Looks like scaling rather than forcing uncommon resolutions. If available, disable low-quality scaling modes and stick close to the panel's native behavior.
Why is the HDR option missing or why do colors look washed out?
Not all portable monitors truly support HDR over every input path; try a different port (USB‑C vs HDMI) or direct connection. In Displays, pick a sane color profile and treat the setup as SDR if HDR isn't stable.
Why will my Apple Silicon Mac not run two external portable monitors as expected?
Many Apple Silicon models have limitations on native external displays; check your exact Mac's supported display count and avoid relying on MST daisy chaining. Use one external portable monitor for stability, or redesign the workflow with Spaces.
Why is the monitor dim or flickering when connected with one cable?
That's commonly a power budget issue: the monitor may not get enough power over bus-powered USB‑C. Connect a dedicated USB‑C PD charger to the monitor (or the hub's PD pass-through) and retest.
Why do USB devices on the hub stop working when the monitor is connected?
The hub may be saturating bandwidth or lacking power. Disconnect high-draw peripherals, connect the hub to a stronger PD charger, and try moving the monitor to a direct connection instead of through the hub.